Labelmania
Documents
Documents
Welcome to my stickers collection!
Some tips
Some tips
Here some information and proposal for beginners and for people open to suggestions.
See also wrinkle page.
Some useful material for collectors are listed below, list is not definitive, whoever has suggestions to add on this matter or on any other can write me.
Each block contains 5 to 10 pages plus a plastic cover (derived from plastic bags for documents), all is fixed with staples.
A suggestion, if you use only one side silicone coated paper (stickers support) draw a doodle or write something on the last page to avoid putting stickers on wrong side, it may happen to take booklet upside down and then you have to pull out stickers from paper side, it is not easy! This does not happen if you use baking paper with both sides silicone coated.
Some people separate pages by tabs with fruits names so as to put apples stickers in apples pages, melons in those of melons and so on. By this way they will always know the fruit of each sticker. Disadvantage is that we don't know in advance which and how many stickers we will find and we can not know how many pages reserve to oranges, how many to peaches and so forth.
I fill my booklets as I find stickers and at the most I take notes on a paper for those stickers without any reference and/or where I think I will not remember origin.
Another possibility is the one I've used for photography, carrying with me a little recorder where I recorded data of each image.
Stickers sources are the followings:
In the case of stickers without tab look for those not totally adherents to fruits, this is easier for those who, by chance, are placed in stalk area, the bending, usually, leaves a part of sticker raised and detached from skin (photo 9).
Easiest to take are those of thick plastic, in most cases, they stick only partly to fruit and detach easily without risk of damage (photo 10).
An advice: don't go hunting for stickers at shops opening, at the moment fruits have just been brought out from refrigerator and surface is wet or even damp and then, in the case of papery stickers, is almost impossible to obtain them whole and also cold glue adheres forcefully. If you are in this situation it is better to come back after 1 or 2 hours, it will be easier to have beautiful stickers.
After an initial period, when I tried to withdraw stickers without anyone see me, I chose to always ask to shopkeeper and, except some rare case of refusal, I always found a lot of cooperation. Refusals are very rare, somebody asks to take only few stickers of same type. In this way, when you should not hide, you can draw stickers at leisure, choosing, whenever possible, best ones without the anxiety of being discovered.
When stickers are abundant I take 10-12 of same type in order to put 1 or 2 in collections and have a good basis for trade. This also helps because sometimes you may realize that exist some differences (wrinkle, colour or otherwise) only at home looking them carefully.
Even when I am sure to have a sticker I will always take at least a couple, differences can escape and I can't remember if sticker I've is paper or plastic, if wrinkle is at right or left.
Exemplary is the case of "Crunch-punch" sports series: I had a full set but I had few duplicates with diver image; I found some of these stickers in Monaco market and I took 2 series and, at home, I noticed colour was very different.
Attention when taking stickers from pears and in some cases even from nectarines and plums. These fruits have a very thin skin and when we try to detach them, especially if glue is strong, it's easy sticker come off from fruit with peel, leaving a clear track. Shopkeeper would not be very happy and even if we try to hide the fault, next time might not be excited to see us.
What I can advise is to try with not very ripe fruit, on those mature tear is certain, look for stickers that are not fully adhering to fruit or are in a position where they are not completely adherent for example close to or on stalk.
It is not convenient to apply much energy but try to separate sticker giving time to glue to separate; when you have raised one part, which allows you to take sticker with your fingers, do not pull the same at 90░ from skin but try to bring forward, almost parallel with an angle close to 180░.
If dealer is a difficult type it is better to leave a sticker which is ripping skin rather than lose a supplier, only solution in this case is to buy fruits and keep them at home.
Particular attention also needs stickers with cuts (photo 11), you have to be very careful because they tear easily; when you raise a corner and reach the cut it is necessary, with tweezers, to lift edge of following portion and so on up to have raised at least half of sticker.
At this point you are fairly relaxed but don't ever let you be in a hurry, ripping is always possible in particular with some mangoes stickers where cut reach near the centre and entire portion is very small.

Go up
Once at home I transfer stickers to their final support : a rectangle of silicone coated paper I've been prepared in advance in some standards dimensions especially for small and medium size stickers, for large ones I cut them by size.
Most common sizes are 19 x 27 mm (most oval stickers), 19 x 29 mm (longest ones), 25 x 27.5 mm (many U.S. or NZ), 27 x 29 mm (many bananas).
In practice I leave a small space on right side or under the sticker for reference number to database and symbol for wrinkles or cuts if present (photo 12). In this way I can treat my stickers as stamps and use philatelic material as albums (photo 3) for their classification.
In the case of stickers received through exchanges it may happen everything from exceptional correspondents who put stickers on silicone coated paper to those who put stickers on paper notebook (very hard to separate). Luckily, at home we can achieve operations calmly, we must never be in a hurry.
Help can come from heat, most of stickers glue will soften when heated, sometimes breath is enough, sometimes you can use a hairdryer or a gas cooker kept to a minimum.
This method is useful in many cases but can't be used with thin plastic stickers and those made of thermal paper (many stickers with only black text), former will deform while latter blackens.
Firstly warms a little the support then, having raised a corner, takes support with one hand, sticker with other and, taking glue area exposed to heat, apply a delicate traction following separation without ever stretch too strong. Glue has an adhesion force that opposes to separation but, if you apply a weak force continuously, it let win and allows you to separate sticker from support.
Big attention should be placed with thin plastic stickers they deform easily if you apply force on a small surface. It's easy to get in trade stickers with a part (usually at right) deformed, they are stickers people has tried to detach from fruit with nails.
In this case it is better to use a thin blade knife, insinuate blade gently, if possible at a point where it is slightly detached from support; when blade is entered for at least 1 mm put your thumb on sticker area beyond blade and try to lift the whole thing being careful that blade remains parallel to surface.
When you have raised a few millimetres of sticker you can continue with your fingers taking raised section between thumb and index, moving it back and exerting a slight traction; when a new sticker portion has raised move your fingers to keep whole raised part so as tension does not always drill on same sticker area but on a following one.
In this way, and with a lot of patience you will succeed to detach sticker from support.
Precautions must be used also with papery stickers, here is not deformation but tear is always lurking. In this case look for detach always external portion moving from first point of separation and following outline and, only after raising all contour, try to detach central portion.
Often, after detaching sticker from support, this is curved or curled ; you can remedy as follow: take it between index and thumb of left hand (for left-handers with right), with other put knife blade at 90░ into glued side and gently exercising a pressure with your thumb on opposite surface you have to slide knife toward other end.
Thus, grading pressure according to sticker type of and to how much it is curved, you can straighten it; sometimes you have to repeated several times the same operation to restore flatness.
In the case of thin plastic stickers, if glue is in good condition, there is no need trying to straighten it since they will easily stick to support without curling.
If you have stickers dirty on back sometimes you can clean them operating as follows: use a perfectly flat surface (a glass, a piece of chipboard covered with plastic laminate etc.) put sticker with glue upwards and hold it with index, with other hand put knife blade at 90░ on sticker and, by a certain pressure, slide knife towards other end.
Sometime you must repeat process several times, in this case clean each time knife blade otherwise you risk to bring back what you have just removed.
This method works well for papery and thick plastic stickers while it is dangerous on those made of thin plastic easily deformed if you exercise a too strong pressure.
In the case of pears, plums and nectarines stickers, where frequently skin breaks away from fruit and remains adherent to it, we can help us wetting skin and making it soften before trying to detach.
Another method is to put a good glue only on skin surface and to attack it on a support that then allows us to detach easily the sticker; when glue is dry, taking off sticker, this would be detached from peel which remains adherent to support.
An almost insoluble case are kiwifruit stickers, most are thin plastic and then with a knife you can only remove the bulk.
If you personally collect these stickers try to take only those who have just leaned on fruits, they will be less dirty.
HAVE A GOOD COLLECTION !!
See also wrinkle page.
Some useful material for collectors are listed below, list is not definitive, whoever has suggestions to add on this matter or on any other can write me.
- Tweezers (photo 1 and 2), those for philatelists are preferred, they have very thin pincers
- Lens (photo 1)
- Desk-sized ruler (photo 1)
- Sheets of Silicone coated paper (for instance sheets of support to adhesive stickers, baking paper etc.)
- Stamp album (photo 3)
- Paper cutter (photo 4)
- Cutter (photo 1)
- Temporary booklet for stickers (photo 1 and 5)
- Knife with thin blade not very sharp (photo 1)
Each block contains 5 to 10 pages plus a plastic cover (derived from plastic bags for documents), all is fixed with staples.
A suggestion, if you use only one side silicone coated paper (stickers support) draw a doodle or write something on the last page to avoid putting stickers on wrong side, it may happen to take booklet upside down and then you have to pull out stickers from paper side, it is not easy! This does not happen if you use baking paper with both sides silicone coated.
Some people separate pages by tabs with fruits names so as to put apples stickers in apples pages, melons in those of melons and so on. By this way they will always know the fruit of each sticker. Disadvantage is that we don't know in advance which and how many stickers we will find and we can not know how many pages reserve to oranges, how many to peaches and so forth.
I fill my booklets as I find stickers and at the most I take notes on a paper for those stickers without any reference and/or where I think I will not remember origin.
Another possibility is the one I've used for photography, carrying with me a little recorder where I recorded data of each image.
Stickers sources are the followings:
- fruit and vegetables shops (photos 6 and 7)
- markets (photo 8)
- super and hypermarkets
- friends and relatives
- Internet, trades
In the case of stickers without tab look for those not totally adherents to fruits, this is easier for those who, by chance, are placed in stalk area, the bending, usually, leaves a part of sticker raised and detached from skin (photo 9).
Easiest to take are those of thick plastic, in most cases, they stick only partly to fruit and detach easily without risk of damage (photo 10).
An advice: don't go hunting for stickers at shops opening, at the moment fruits have just been brought out from refrigerator and surface is wet or even damp and then, in the case of papery stickers, is almost impossible to obtain them whole and also cold glue adheres forcefully. If you are in this situation it is better to come back after 1 or 2 hours, it will be easier to have beautiful stickers.
After an initial period, when I tried to withdraw stickers without anyone see me, I chose to always ask to shopkeeper and, except some rare case of refusal, I always found a lot of cooperation. Refusals are very rare, somebody asks to take only few stickers of same type. In this way, when you should not hide, you can draw stickers at leisure, choosing, whenever possible, best ones without the anxiety of being discovered.
When stickers are abundant I take 10-12 of same type in order to put 1 or 2 in collections and have a good basis for trade. This also helps because sometimes you may realize that exist some differences (wrinkle, colour or otherwise) only at home looking them carefully.
Even when I am sure to have a sticker I will always take at least a couple, differences can escape and I can't remember if sticker I've is paper or plastic, if wrinkle is at right or left.
Exemplary is the case of "Crunch-punch" sports series: I had a full set but I had few duplicates with diver image; I found some of these stickers in Monaco market and I took 2 series and, at home, I noticed colour was very different.
Attention when taking stickers from pears and in some cases even from nectarines and plums. These fruits have a very thin skin and when we try to detach them, especially if glue is strong, it's easy sticker come off from fruit with peel, leaving a clear track. Shopkeeper would not be very happy and even if we try to hide the fault, next time might not be excited to see us.
What I can advise is to try with not very ripe fruit, on those mature tear is certain, look for stickers that are not fully adhering to fruit or are in a position where they are not completely adherent for example close to or on stalk.
It is not convenient to apply much energy but try to separate sticker giving time to glue to separate; when you have raised one part, which allows you to take sticker with your fingers, do not pull the same at 90░ from skin but try to bring forward, almost parallel with an angle close to 180░.
If dealer is a difficult type it is better to leave a sticker which is ripping skin rather than lose a supplier, only solution in this case is to buy fruits and keep them at home.
Particular attention also needs stickers with cuts (photo 11), you have to be very careful because they tear easily; when you raise a corner and reach the cut it is necessary, with tweezers, to lift edge of following portion and so on up to have raised at least half of sticker.
At this point you are fairly relaxed but don't ever let you be in a hurry, ripping is always possible in particular with some mangoes stickers where cut reach near the centre and entire portion is very small.

Go up
Once at home I transfer stickers to their final support : a rectangle of silicone coated paper I've been prepared in advance in some standards dimensions especially for small and medium size stickers, for large ones I cut them by size.
Most common sizes are 19 x 27 mm (most oval stickers), 19 x 29 mm (longest ones), 25 x 27.5 mm (many U.S. or NZ), 27 x 29 mm (many bananas).
In practice I leave a small space on right side or under the sticker for reference number to database and symbol for wrinkles or cuts if present (photo 12). In this way I can treat my stickers as stamps and use philatelic material as albums (photo 3) for their classification.
In the case of stickers received through exchanges it may happen everything from exceptional correspondents who put stickers on silicone coated paper to those who put stickers on paper notebook (very hard to separate). Luckily, at home we can achieve operations calmly, we must never be in a hurry.
Help can come from heat, most of stickers glue will soften when heated, sometimes breath is enough, sometimes you can use a hairdryer or a gas cooker kept to a minimum.
This method is useful in many cases but can't be used with thin plastic stickers and those made of thermal paper (many stickers with only black text), former will deform while latter blackens.
Firstly warms a little the support then, having raised a corner, takes support with one hand, sticker with other and, taking glue area exposed to heat, apply a delicate traction following separation without ever stretch too strong. Glue has an adhesion force that opposes to separation but, if you apply a weak force continuously, it let win and allows you to separate sticker from support.
Big attention should be placed with thin plastic stickers they deform easily if you apply force on a small surface. It's easy to get in trade stickers with a part (usually at right) deformed, they are stickers people has tried to detach from fruit with nails.
In this case it is better to use a thin blade knife, insinuate blade gently, if possible at a point where it is slightly detached from support; when blade is entered for at least 1 mm put your thumb on sticker area beyond blade and try to lift the whole thing being careful that blade remains parallel to surface.
When you have raised a few millimetres of sticker you can continue with your fingers taking raised section between thumb and index, moving it back and exerting a slight traction; when a new sticker portion has raised move your fingers to keep whole raised part so as tension does not always drill on same sticker area but on a following one.
In this way, and with a lot of patience you will succeed to detach sticker from support.
Precautions must be used also with papery stickers, here is not deformation but tear is always lurking. In this case look for detach always external portion moving from first point of separation and following outline and, only after raising all contour, try to detach central portion.
Often, after detaching sticker from support, this is curved or curled ; you can remedy as follow: take it between index and thumb of left hand (for left-handers with right), with other put knife blade at 90░ into glued side and gently exercising a pressure with your thumb on opposite surface you have to slide knife toward other end.
Thus, grading pressure according to sticker type of and to how much it is curved, you can straighten it; sometimes you have to repeated several times the same operation to restore flatness.
In the case of thin plastic stickers, if glue is in good condition, there is no need trying to straighten it since they will easily stick to support without curling.
If you have stickers dirty on back sometimes you can clean them operating as follows: use a perfectly flat surface (a glass, a piece of chipboard covered with plastic laminate etc.) put sticker with glue upwards and hold it with index, with other hand put knife blade at 90░ on sticker and, by a certain pressure, slide knife towards other end.
Sometime you must repeat process several times, in this case clean each time knife blade otherwise you risk to bring back what you have just removed.
This method works well for papery and thick plastic stickers while it is dangerous on those made of thin plastic easily deformed if you exercise a too strong pressure.
In the case of pears, plums and nectarines stickers, where frequently skin breaks away from fruit and remains adherent to it, we can help us wetting skin and making it soften before trying to detach.
Another method is to put a good glue only on skin surface and to attack it on a support that then allows us to detach easily the sticker; when glue is dry, taking off sticker, this would be detached from peel which remains adherent to support.
An almost insoluble case are kiwifruit stickers, most are thin plastic and then with a knife you can only remove the bulk.
If you personally collect these stickers try to take only those who have just leaned on fruits, they will be less dirty.
HAVE A GOOD COLLECTION !!


Italiano English Franšais
Click on picture to magnify
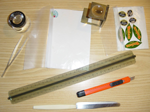
1 - some objects described in text.
 2 - Philatelic tweezers
 3 - two stamps albums employed for stickers classification.
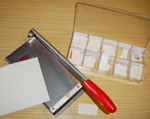 4 - paper cutter and box with standard dimensions cut supports
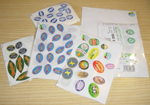 5 - some temporary booklets
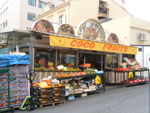 6 - very nice fruit shop at Roquebrune (France).
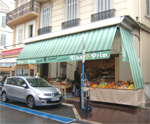 7 - Early fruits shop at Cannes (France) near Covered Market.
 8 - Nice market (France) shows a very big variety of fruits and vegetables in every season and with any weather.
 9 - nectarine with sticker placed in stalk area where it is not completely adherent therefore it is easy to detach.
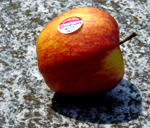 10 - apple with thick plastic sticker only partially adherent, remove it is very easy.
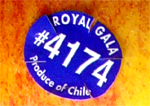 11 - sticker with 6 cuts, corners are raised to point out cuts, frequently these stickers are totally adherent to fruit surface.
 12 - two stickers placed on final support with respectively cuts and wrinkle symbols.